Wave Templates in D365 Advanced Warehouse Management: How to Design Them So Work Creation Actually Behaves
If there is one piece of configuration in D365’s Advanced Warehouse Management module that quietly decides whether your outbound operation hums or grinds, it’s the wave template. I’ve seen warehouses where pickers stand idle waiting for work because waves only process on a manual click, and I’ve seen the opposite: floors flooded with hundreds of tiny work orders because every sales line releases into its own wave. Both problems trace back to the same screen: Warehouse management > Setup > Waves > Wave templates.
In this article I want to walk through how wave templates really work, the decisions you need to make before touching the configuration, and the settings that most often get misunderstood.
What a wave actually is
A wave is a grouping mechanism. When you release demand to the warehouse (sales orders, transfer orders, or production orders for raw material picking), the system needs to decide when and how to turn that released demand into warehouse work. The wave is the container that collects released lines, and wave processing is the moment that container is turned into pick work via the work templates and location directives.
This matters because the wave is your throttle. If you process too eagerly, you lose the ability to consolidate picks; if you process too lazily, your release-to-pick lead time balloons.
There are three wave types (Shipping, Production, and Kanban), and each warehouse and wave type combination evaluates wave templates in sequence, top to bottom, using the template’s filter criteria: site, warehouse, and any query you add. The first template whose criteria match wins. Sequence matters enormously: put your most specific templates at the top and your catch-all at the bottom, or your carefully crafted “carrier X express orders” template will never be hit.
Here is the full lifecycle from release to a picker’s scanner, with the decision points the wave template controls:
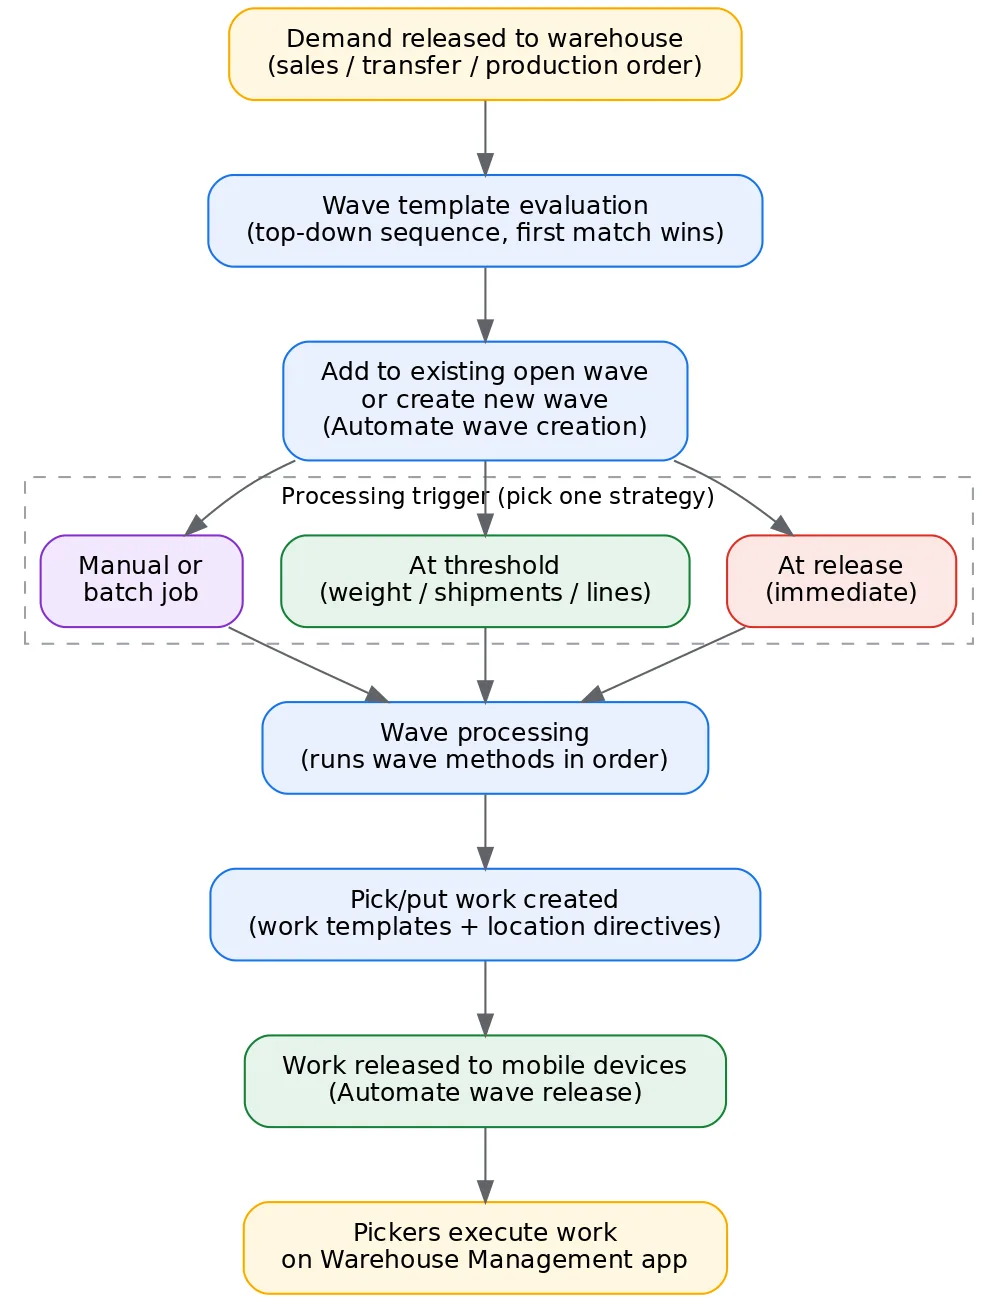
The four automation flags people confuse
On every wave template you’ll find a cluster of toggles that control automation, and in my experience these are the most frequently misconfigured settings in the whole module.
Automate wave creation. When a line is released to the warehouse, the system either adds it to an existing open wave that matches the template, or creates a new wave for it. If this is off, someone has to create waves manually from the All waves form. Most operations want this on.
Process wave at release to warehouse. This is the aggressive one. The moment demand is released, the wave is processed immediately and work is created right away. It works well for same-day, high-urgency flows. It works poorly if you want to consolidate multiple orders into efficient pick paths, because each release event processes on its own and you forfeit batching.
Process wave automatically at threshold. The wave accumulates lines until it hits a threshold you define (weight, shipment count, or line count) and then processes itself. This is the middle ground I end up recommending most often for wholesale-style operations: you get consolidation without depending on a human to remember to click “Process”.
Automate wave release. This one is subtle but important. It releases the work created by the wave so it’s visible and executable on mobile devices. If work is created but pickers can’t see it on the mobile app, this flag (or a missing work release step) is one of the first things I check.
A combination I see go wrong: “Automate wave creation” on, everything else off, and no batch job scheduled. The result is that waves pile up in an open state and nothing reaches the floor until someone notices. If you choose manual or threshold-based processing, decide explicitly who or what processes leftover waves; this is typically a scheduled wave processing batch job at cutoff times.
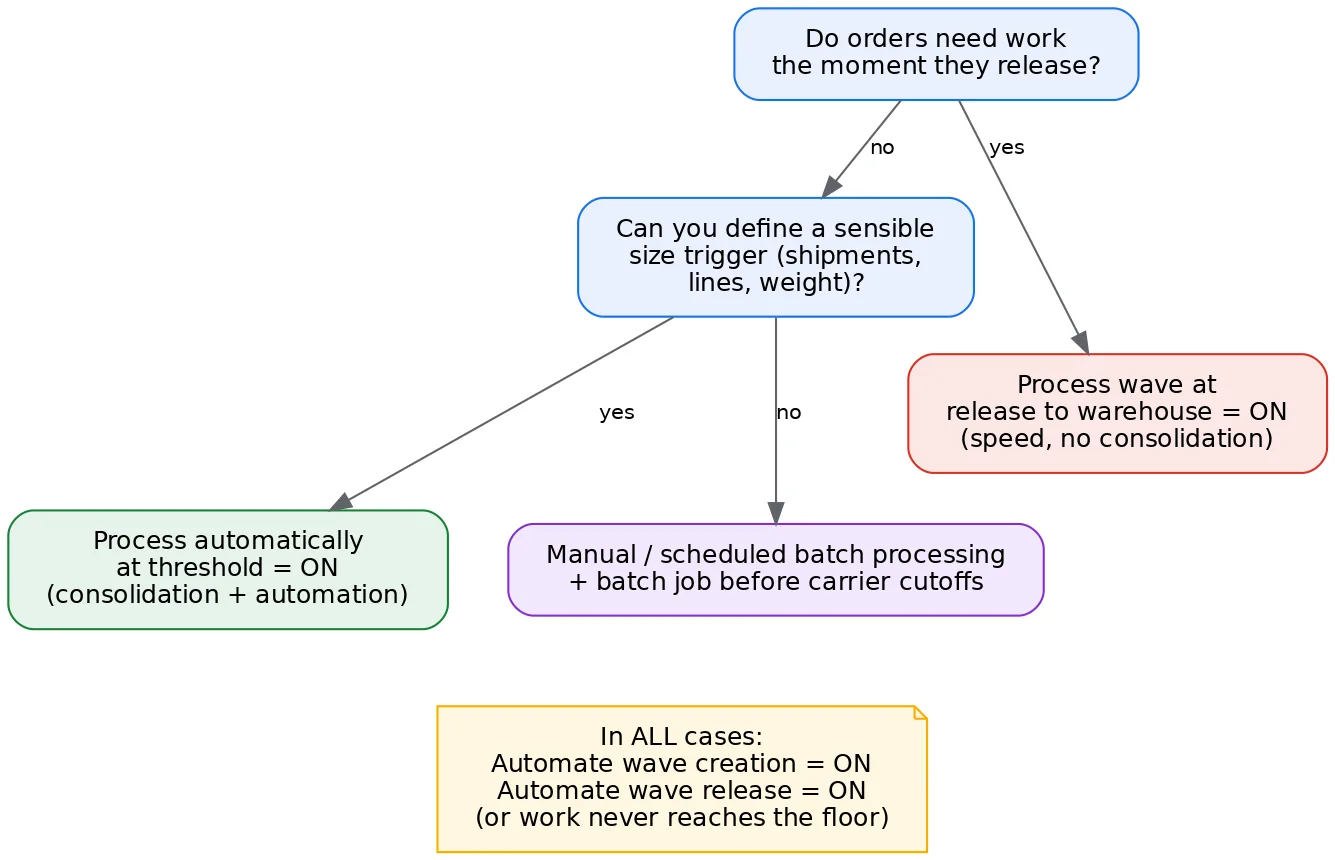
This decision tree summarizes how I choose the processing trigger:
Wave methods: the assembly line inside the template
The Methods section of the wave template is an ordered list of steps the wave executes. For a shipping wave the usual sequence is:
- Allocate wave reserves inventory at the location level against the demand lines.
- Create work runs work templates and location directives to generate pick and put work.
- Containerize (optional) must sit before create work if you use containerization, because container builds drive how work is structured.
- Release wave (when automated) makes the work available for execution.

I have two field-tested notes here. First, if you add replenishment as a wave step (wave demand replenishment), the wave can generate replenishment work for picking locations that can’t satisfy the allocation. Understand the sequencing, though: pick work for the shortfall is created with a dependency on the replenishment work completing. That’s powerful, but it means a stuck replenishment blocks the outbound pick, so your replenishment work needs its own monitoring. Second, the methods list is one of those places where “it worked in the demo” fails in production: a method you never configured downstream (for example, containerization without container build templates) will throw errors at processing time, not at setup time.
Sizing waves: the boundaries that protect your floor
Beyond thresholds, the template offers maximum values for wave weight, shipment count, and line count. These are your guardrails. Without them, a big release (think of master planning releasing a day’s worth of transfer orders at once) can produce a monster wave that takes a long time to process and creates an unmanageable wall of work.
My rule of thumb when starting greenfield is to size waves so that one wave roughly equals what a picker or a small group of pickers can complete in 30 to 60 minutes. You’ll tune it later, but it gives operations a rhythm: waves become a unit of floor management, not just a technical artifact.
Also consider the “Assign to open waves” behavior: with automated wave creation, new releases join an existing open wave for the same template until it’s processed or hits a maximum. If you want strict order-per-wave behavior (some carrier integrations or cross-dock flows need it), set the maximums accordingly or process at release.
Performance considerations
Wave processing is one of the heavier operations in the system because allocation, work creation, and location directive evaluation all happen inside it. A few practices have paid off for me consistently:
- I enable wave processing in batch (a wave template option) so processing runs on the batch server instead of interactively blocking the user who triggered the release.
- I watch the number of location directives and their query complexity; every work line evaluates them, and bloated directive lists are the most common cause of slow waves I encounter.
- When I process at threshold, I stagger thresholds across templates so multiple large waves don’t process simultaneously at the same cutoff.
- I use the wave processing history log religiously when troubleshooting; it tells you exactly which step failed and usually why (no inventory to allocate, no valid location directive, missing container setup).
A practical starting configuration
For a mid-size distribution warehouse doing next-day shipping, this baseline serves well: automate wave creation ON; process at release OFF; threshold processing ON with a shipment-count threshold tuned to pick-path efficiency; a scheduled batch job that processes any remaining open waves 30 minutes before each carrier cutoff; and automate wave release ON, with work visibility controlled through work classes and mobile device menu item filters. Express or same-day orders get their own template, higher in the sequence, with “Process at release” ON.
Key takeaways
- The wave template is your outbound throttle: decide deliberately between process-at-release (speed) and threshold or manual processing (consolidation).
- Template sequence is evaluated top-down and the first match wins, so specific templates belong above the catch-all.
- The four automation flags do different jobs; “creation” without “processing” and without a batch job is the classic stalled-wave misconfiguration.
- Wave methods run in order and fail at processing time, not setup time, so test the full chain including containerization and replenishment.
- Cap wave size so a wave maps to a sensible unit of floor work, and run processing in batch for performance.
Get the wave template right and most of the downstream drama (idle pickers, work floods, missed cutoffs) simply never materializes. In a future post I’ll go one layer deeper into work templates and location directives, which is where the work created by your waves actually takes shape.
If there is one piece of configuration in D365’s Advanced Warehouse Management module that quietly decides whether your outbound operation hums or grinds, it’s the wave template. I’ve seen warehouses where pickers stand idle waiting for work because waves only process on a manual click, and I’ve seen the opposite: floors flooded with hundreds of tiny work orders because every sales line releases into its own wave. Both problems trace back to the same screen: Warehouse management > Setup > Waves > Wave templates.
In this article I want to walk through how wave templates really work, the decisions you need to make before touching the configuration, and the settings that most often get misunderstood.
What a wave actually is
A wave is a grouping mechanism. When you release demand to the warehouse (sales orders, transfer orders, or production orders for raw material picking), the system needs to decide when and how to turn that released demand into warehouse work. The wave is the container that collects released lines, and wave processing is the moment that container is turned into pick work via the work templates and location directives.
This matters because the wave is your throttle. If you process too eagerly, you lose the ability to consolidate picks; if you process too lazily, your release-to-pick lead time balloons.
There are three wave types (Shipping, Production, and Kanban), and each warehouse and wave type combination evaluates wave templates in sequence, top to bottom, using the template’s filter criteria: site, warehouse, and any query you add. The first template whose criteria match wins. Sequence matters enormously: put your most specific templates at the top and your catch-all at the bottom, or your carefully crafted “carrier X express orders” template will never be hit.
Here is the full lifecycle from release to a picker’s scanner, with the decision points the wave template controls:
The four automation flags people confuse
On every wave template you’ll find a cluster of toggles that control automation, and in my experience these are the most frequently misconfigured settings in the whole module.
Automate wave creation. When a line is released to the warehouse, the system either adds it to an existing open wave that matches the template, or creates a new wave for it. If this is off, someone has to create waves manually from the All waves form. Most operations want this on.
Process wave at release to warehouse. This is the aggressive one. The moment demand is released, the wave is processed immediately and work is created right away. It works well for same-day, high-urgency flows. It works poorly if you want to consolidate multiple orders into efficient pick paths, because each release event processes on its own and you forfeit batching.
Process wave automatically at threshold. The wave accumulates lines until it hits a threshold you define (weight, shipment count, or line count) and then processes itself. This is the middle ground I end up recommending most often for wholesale-style operations: you get consolidation without depending on a human to remember to click “Process”.
Automate wave release. This one is subtle but important. It releases the work created by the wave so it’s visible and executable on mobile devices. If work is created but pickers can’t see it on the mobile app, this flag (or a missing work release step) is one of the first things I check.
A combination I see go wrong: “Automate wave creation” on, everything else off, and no batch job scheduled. The result is that waves pile up in an open state and nothing reaches the floor until someone notices. If you choose manual or threshold-based processing, decide explicitly who or what processes leftover waves; this is typically a scheduled wave processing batch job at cutoff times.
This decision tree summarizes how I choose the processing trigger:
Wave methods: the assembly line inside the template
The Methods section of the wave template is an ordered list of steps the wave executes. For a shipping wave the usual sequence is:
- Allocate wave reserves inventory at the location level against the demand lines.
- Create work runs work templates and location directives to generate pick and put work.
- Containerize (optional) must sit before create work if you use containerization, because container builds drive how work is structured.
- Release wave (when automated) makes the work available for execution.
I have two field-tested notes here. First, if you add replenishment as a wave step (wave demand replenishment), the wave can generate replenishment work for picking locations that can’t satisfy the allocation. Understand the sequencing, though: pick work for the shortfall is created with a dependency on the replenishment work completing. That’s powerful, but it means a stuck replenishment blocks the outbound pick, so your replenishment work needs its own monitoring. Second, the methods list is one of those places where “it worked in the demo” fails in production: a method you never configured downstream (for example, containerization without container build templates) will throw errors at processing time, not at setup time.
Sizing waves: the boundaries that protect your floor
Beyond thresholds, the template offers maximum values for wave weight, shipment count, and line count. These are your guardrails. Without them, a big release (think of master planning releasing a day’s worth of transfer orders at once) can produce a monster wave that takes a long time to process and creates an unmanageable wall of work.
My rule of thumb when starting greenfield is to size waves so that one wave roughly equals what a picker or a small group of pickers can complete in 30 to 60 minutes. You’ll tune it later, but it gives operations a rhythm: waves become a unit of floor management, not just a technical artifact.
Also consider the “Assign to open waves” behavior: with automated wave creation, new releases join an existing open wave for the same template until it’s processed or hits a maximum. If you want strict order-per-wave behavior (some carrier integrations or cross-dock flows need it), set the maximums accordingly or process at release.
Performance considerations
Wave processing is one of the heavier operations in the system because allocation, work creation, and location directive evaluation all happen inside it. A few practices have paid off for me consistently:
- I enable wave processing in batch (a wave template option) so processing runs on the batch server instead of interactively blocking the user who triggered the release.
- I watch the number of location directives and their query complexity; every work line evaluates them, and bloated directive lists are the most common cause of slow waves I encounter.
- When I process at threshold, I stagger thresholds across templates so multiple large waves don’t process simultaneously at the same cutoff.
- I use the wave processing history log religiously when troubleshooting; it tells you exactly which step failed and usually why (no inventory to allocate, no valid location directive, missing container setup).
A practical starting configuration
For a mid-size distribution warehouse doing next-day shipping, this baseline serves well: automate wave creation ON; process at release OFF; threshold processing ON with a shipment-count threshold tuned to pick-path efficiency; a scheduled batch job that processes any remaining open waves 30 minutes before each carrier cutoff; and automate wave release ON, with work visibility controlled through work classes and mobile device menu item filters. Express or same-day orders get their own template, higher in the sequence, with “Process at release” ON.
Key takeaways
- The wave template is your outbound throttle: decide deliberately between process-at-release (speed) and threshold or manual processing (consolidation).
- Template sequence is evaluated top-down and the first match wins, so specific templates belong above the catch-all.
- The four automation flags do different jobs; “creation” without “processing” and without a batch job is the classic stalled-wave misconfiguration.
- Wave methods run in order and fail at processing time, not setup time, so test the full chain including containerization and replenishment.
- Cap wave size so a wave maps to a sensible unit of floor work, and run processing in batch for performance.
Get the wave template right and most of the downstream drama (idle pickers, work floods, missed cutoffs) simply never materializes. In a future post I’ll go one layer deeper into work templates and location directives, which is where the work created by your waves actually takes shape.
No comments yet. Be the first to comment!